The enhanced Physician Notifications feature enables physicians and their designated staff to receive email and text message alerts for the following types of patient event notifications:
- Admission
- Discharge
- Emergency Room
- Observation
- Results (All)
- Results (Post Discharge)
For you to receive alerts, an administrator first links one or more physicians to your portal user account. The administrator may complete the setup on your behalf or may ask you to complete the setup using the Manage Notifications page. Either way, you can use the Manage Notifications page to modify your notifications information as needed.
Manage Notifications Help
- Video Tutorial: Physician Notifications
Notifications Overview
- Notification Types
- Email and Text Message Alerts
- Alerts Delivery Schedule (Every Day or Specified Days)
- Alerts Delivery Mode (Batch or Individual)
- Batch Delivery Scenarios
- Notification Documents in Results Inbox
- Sending Alerts to Multiple Users
- Security and Alerts
Manage Notifications
- Access Manage Notifications
- User Notification Information
- User Notification Delivery Options
- User Notification Delivery Schedule - Every Day
- User Notification Delivery Schedule - Specified Days
- Notification Delivery Mode Descriptions
Notifications Overview
Notification Types
The following Notification Types are available with the portal:
- Admission Notification: Your patient was admitted to the hospital.
- Discharge Notification: Your patient was discharged from the hospital.
- Emergency Room Notification: Your patient visited the emergency department.
- Observation Notification: Your patient was placed in observation status.
- Result Notification: A result was delivered for your patient. Note: Alerts for result notifications are recommended for low-volume practices only.
- Post-Discharge Result Notification: A result was delivered for your patient after the patient was discharged from an inpatient or emergency visit.
Note: You can set up email and text alerts only for the notification types that are enabled for your portal and for which you are authorized.
Email and Text Message Alerts
You have the option to receive alerts by email, text message, or both. Alerts signal that a new notification document is being delivered to the Results Inbox.
Alerts Delivery Schedule (Every Day or Specified Days)
You can select an alerts delivery schedule that meets your needs. An Every Day schedule is the same seven days a week for all notification types. A Specified Days schedule is more flexible than an Every Day schedule. With a Specified Days schedule, you can select a different alerts delivery schedule for each day of the week. Like the Every Day schedule, the Specified Days schedule applies to all notification types.
Alerts Delivery Mode (Batch or Individual)
You have the option to receive batch alerts or individual alerts. Batch alerts are recommended if you want to minimize the number of alerts you receive. For example, if five of your patients are admitted to the hospital during a specific period, with individual alerts you receive five Patient Admission Notification emails, text messages, or both. With batch alerts, you receive one Patient Admission Batch Notification email, text message, or both.
Batch Delivery Scenarios
See the following table for scenarios that explain the number of alerts to expect when you select Batch Alerts delivery mode: 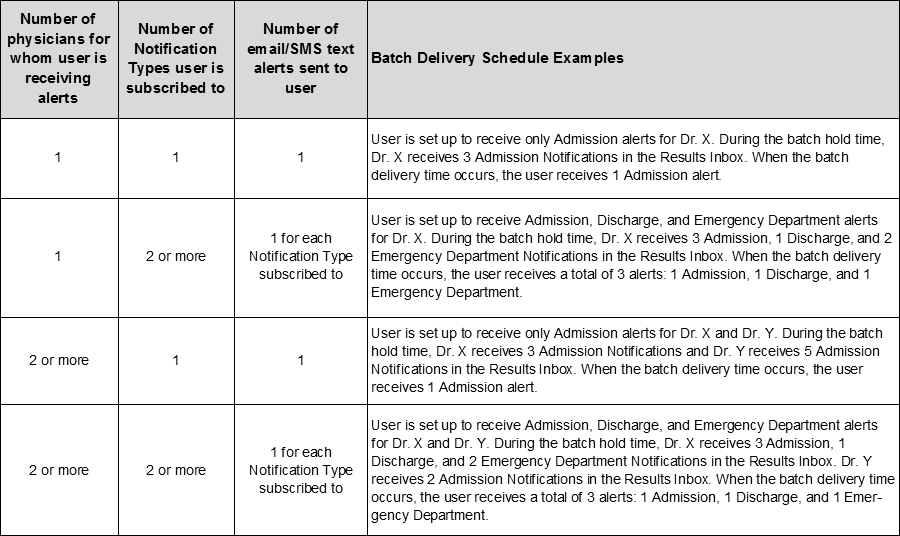
Notification Documents in Results Inbox
Each email or text alert includes a link to log in to the portal and automatically open the Results Inbox, which is prefiltered for the corresponding notification type. The Notification Type filter in the Results Inbox is used to create the prefiltered view. You can select a document ID to view a notification report or result.
Note: If post-discharge results are enabled for your portal, the Post Discharge Result icon is displayed below the check box in a row to indicate a post-discharge result.
Sending Alerts to Multiple Users
Practice administrators use the Physician Notification Admin feature to link physicians to authorized portal users for alerts delivery. Authorized portal users can include physicians and their designated staff. Administrators can set up physician portal users to receive alerts for other physicians in the practice.
Security and Alerts
The email and text messages alert you to patient event notifications and provide limited information. The alerts include a link to log in to your Provider Portal account and see a prefiltered view of the Results Inbox for the corresponding notification type. The alerts contain no PHI (protected health information). You must log in to the portal to see the patient event details.
Manage Notifications
Access Manage Notifications
From the menu bar, select My Account > Manage Notifications. The Manage Notifications page is displayed.
User Notification Information
Complete the following steps to provide contact information for email and text message alerts:
- Expand User Notification Information to display your contact information.
- Select Use My Profile to use contact information from your portal account profile and update your account profile with any changes that you save. Alternatively, select Use Alternate Profile to use contact information that is not saved to your account profile.
- Update contact information as needed to receive alerts through email, text message, or both.
- Select the check box next to the alerts notice to agree to receive alerts using the information you provided. This is required before you can save information on the page.
- Select Save to save your changes. (Note: Reset removes any unsaved changes on the page.)
User Notification Delivery Options
Complete the following steps to select your email and text message alert preferences for patient event notifications:
- Expand User Notification Delivery Options to display the event notification types that are available to you. Only the notification types that are enabled for your portal and for which you are authorized are displayed.
- Select one or more check boxes to indicate your email and text message alert preferences.
Note: The Results (All) notification type is intended only for very low volume practices that do not regularly access the portal. The Results (All) notification type is meant as a prompt to inform you that a result arrived and is available for viewing.
- Select the check box next to the alerts notice to agree to receive alerts using the information you provided. This is required before you can save information on the page.
- Select Save to save your changes. If the Save button is unavailable, or a confirmation message is not displayed after you select Save, check under User Notification Delivery Information for required information that is missing. (Note: Reset removes any unsaved changes on the page.)
User Notification Delivery Schedule - Every Day
The default notification delivery schedule is individual alerts all day every day. You can select a different schedule. This section has steps to create a schedule that is the same every day. See User Notification Delivery Schedule - Specified Days for steps to create a schedule that varies by day of the week.
Note: The schedule that is displayed when you select Save is the schedule that is saved.
Complete the following steps to create a notification delivery schedule that is the same seven days a week:
- Expand User Notification Delivery Schedule to create a notification delivery schedule for alerts.
- Select the Every Day schedule option for a delivery schedule that is the same every day.
- Make a selection from the Notification Delivery Mode list. See Notification Delivery Mode Descriptions for more information on each delivery mode. Note: The delivery mode that you select applies to all of the notification types that you are subscribed to (under User Notification Delivery Options).
- If you selected Individual Alerts - Specified Times from the Notification Delivery Mode list, go to Step 5. If you selected Batch Alerts from the Notification Delivery Mode list, make selections from the Delivery Times list to specify alert delivery timing (at least one delivery time is required), and then go to Step 6; otherwise, go to Step 6.
- For Individual Alerts - Specified Times, select start and end times to specify the time periods for alert delivery. At least one time period is required. To add more than one time period, select the plus sign (+). Note: To remove a time period, select the plus sign (+), then select X for that time period.
- Select the check box next to the alerts notice to agree to receive alerts using the information you provided. This is required before you can save information on the page.
- Select Save to save your changes. The schedule that is displayed when you select Save is the schedule that is saved. (Note: Reset removes any unsaved changes on the page.)
User Notification Delivery Schedule - Specified Days
The default notification delivery schedule is individual alerts all day every day. You can select a different schedule. This section has steps to create a schedule that varies by day of the week. See User Notification Delivery Schedule - Every Day for steps to create a schedule that is the same every day.
Note: The schedule that is displayed when you select Save is the schedule that is saved.
Complete the following steps to create a notification delivery schedule that varies by day of the week:
- Expand User Notification Delivery Schedule to create a notification delivery schedule for alerts.
- Select the Specified Days schedule option for a delivery schedule that varies by day of the week.
- For a day of the week, make a selection from the Notification Delivery Mode list. See Notification Delivery Mode Descriptions for more information on each delivery mode. Note: The delivery mode that you select applies to all of the notification types that you are subscribed to (under User Notification Delivery Options).
- If you selected Individual Alerts - Specified Times from the Notification Delivery Mode list, go to Step 5. If you selected Batch Alerts from the Notification Delivery Mode list, make selections from the Delivery Times list to specify alert delivery timing (at least one delivery time is required), and then go to Step 6; otherwise, go to Step 6.
- For Individual Alerts - Specified Times, select start and end times to specify the time periods for alert delivery. At least one time period is required. To add more than one time period, select the plus sign (+). Note: To remove a time period, select the plus sign (+), then select X for that time period.
- Repeat Steps 3 through 5 for each day of the week as needed.
- Select the check box next to the alerts notice to agree to receive alerts using the information you provided. This is required before you can save information on the page.
- Select Save to save your changes. The schedule that is displayed when you select Save is the schedule that is saved. (Note: Reset removes any unsaved changes on the page.)
Notification Delivery Mode Descriptions
- No Alerts: No Alerts means that alerts are not delivered to the user.
- Batch Alerts: Batch Alerts reduce the number of alerts the user receives and are by Notification Type. For example, an alert for Patient Emergency Batch Notification indicates that one or more of the physician's patients had an emergency room visit. You must select delivery times for batch alerts.
- Individual Alerts - All Day: For Individual Alerts - All Day, the delivery window is 24 hours a day. This is the default delivery mode.
- Individual Alerts - Specified Times: For Individual Alerts - Specified Times, you must select specific periods of time in hours for individual alerts delivery.
Back to User Notification Delivery Schedule - Every Day
Back to User Notification Delivery Schedule - Specified Days