The document grid is displayed in the Documents tab of the patient summary. The document grid provides an organized way to view the selected patient's documents.
Note: In the document grid, the system displays all documents your practice or facility received pertaining to the selected patient. Use this view if an expected result is not in the Results Inbox.
The Critical Results feature was added in Provider Portal 7.1.
Patient Summary Documents Tab Help
- Access Patient Documents
- Search Mode
- Quick Filters
- Document Grid Views: Category; Date; Visit
- Grouped By
- Expand/Collapse Folders
- Check All/Uncheck All
- Open All/Close All
- Filters
- Columns
- Sort
- View and Print One Document
- Multiple Copies of the Same Document
- Actions: View Documents
- Actions: View Documents Without Breaks
- Actions: Send to My EMR
- Actions: Delete Documents
Access Patient Documents
A patient's documents can be accessed from the following locations:
- Secure Messaging Inbox (Inbox, Drafts, Sent, Archive, and Notifications tabs)
- Results Inbox
- Search > Document
- Search > Patient
- Orders Inbox
To access a patient's documents, select one of the following options:
- From a row, select Actions > Documents.
- From a row, select the patient name. The patient summary is displayed. Select the Documents tab.
- From a row, select Actions > Patient Summary. The patient summary is displayed. Select the Documents tab.
Search Mode
In the patient summary, authorized users can change search mode from Patient Archive to Global and vice versa. The current selection is highlighted in gray. Some users are authorized for patient archive search only, and others are not authorized for either search.
Global Search
Complete the following steps to search the global document repository for a patient's documents:
- From the patient summary, if the current search mode is Patient Archive (gray), select Global. The Search Reasons dialog box opens. Read the warning message.
- Select a search reason.
- Select OK.
- If you selected a search reason that requires further explanation, enter the required information in the box and select OK. The global documents are displayed in the document grid.
Note: Documents from a patient archive search and documents from a global search are not combined in the document grid. In the document grid, you see documents returned from a patient archive query or a global query. In many cases, the documents returned from the global search will be the same as the documents returned from the patient archive search.
Quick Filters
Use Quick Filters to search for a patient's documents. Select the Filters button to perform more specific filtering. See Filters for more information. The following Quick Filters are available:
- Document Name
- Document Category
- Document Type
- Document Date Range
Complete the following steps to use Quick Filters:
- If collapsed, select Quick Filters to expand the section.
- Enter or select values for one or more filter parameters.
- Select Apply. Documents that meet the search criteria are displayed. In addition, a Filtered indicator and message are displayed above the grid. The message indicates the number of documents displayed out of the total number of documents.
- If you want to remove the selected filter parameters, select Clear.
Note: Your filters are not saved when you close the patient summary.
Document Grid Views: Category; Date; Visit
The document grid has three high-level views for a patient's documents: (1) Category; (2) Date; (3) Visit. The default view is Category.
Note: The view that is active when you close the patient summary is the default view the next time you access the Documents tab.
Category View: 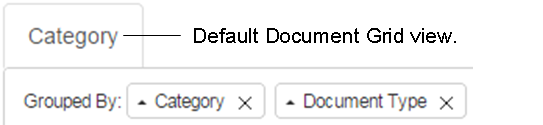
Date View: 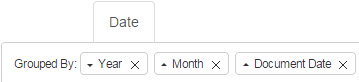
Visit View: 
Grouped By
Each document grid view (Category, Date, Visit), has default Grouped By attributes. You can change the Grouped By attributes to meet your needs when you view a patient's documents.
Note: Changes to Grouped By are not saved when you close the patient summary.
Add to Grouped By
Select and drag a column heading into the Grouped By area to add it to the attributes (the actual column heading stays put).
Remove from Grouped By
Select X to remove an attribute from the Grouped By area (the actual column heading stays put).
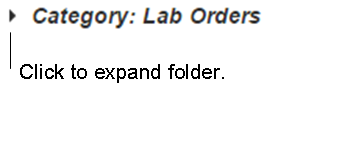
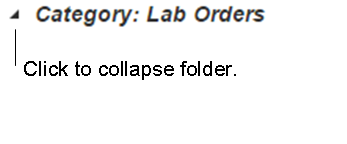
Expand/Collapse Folders
A system setting determines the default level of expansion in the document grid.
Complete the following steps to expand and collapse folders in the document grid:
- If you want to expand a folder, select the right arrow icon.
- If you want to collapse a folder, select the right angle icon.
- If you want to expand all folders at once, select Open All.
- If you want to collapse all folders at once, select Close All.
Multiple Copies of Document
At the document level, the multiple documents icon indicates that multiple copies of the same document exist. The most recent version of the document is displayed next to the multiple documents icon. Select the right arrow icon to expand the view. 
All copies of the document are displayed in the expanded view. 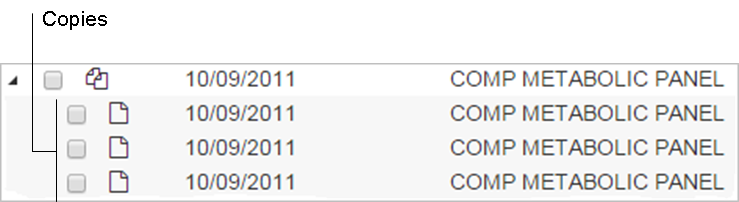
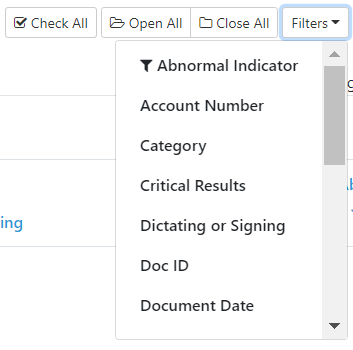
Check All/Uncheck All
Complete the following steps to select or deselect all of the patient's documents:
- If you want to select all of the patient's documents, select Check All.

- If you want to perform an action on all of the documents, select a command from the Actions list.
- If you want to deselect all of the patient's documents, select Uncheck All.
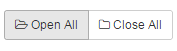
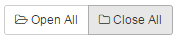
Open All/Close All
Complete the following steps to open or close all folders at one time.
- If you want to expand all folders at one time, select Open All.
- If you want to collapse all folders at one time, select Close All.
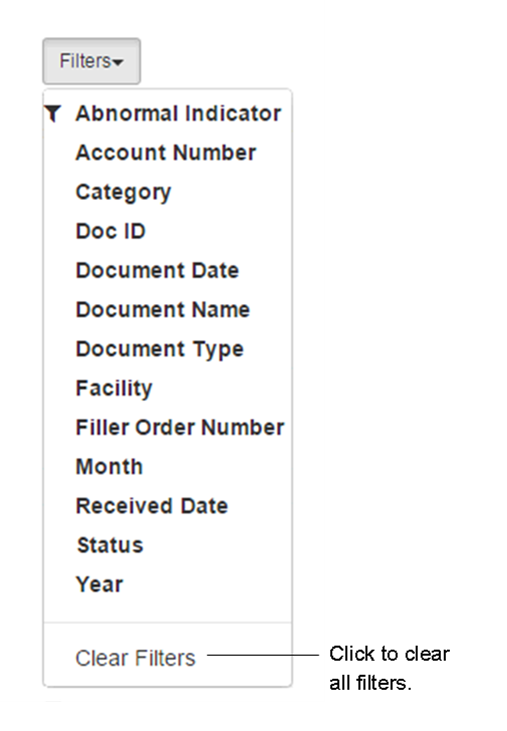
Filters
Use filters to speed up your search for patient documents. You can apply a filter when the document grid is fully collapsed, or at any expansion level.
Note: Your filters are not saved when you close the patient summary.
- Configure Filters
- Clear Filters
See also Quick Filters
Configure Filters
Complete the following steps to use filters in the document grid:
- Select Filters.
 Available filters are displayed.
- Select a filter. A dialog box opens for that filter.
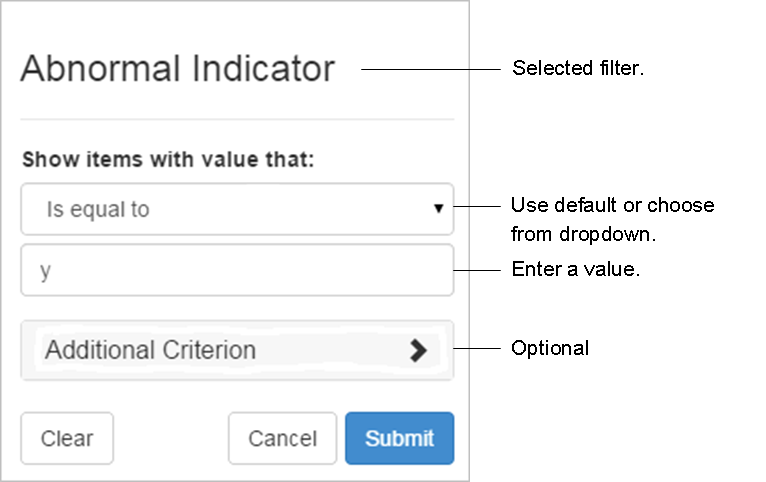
- Use the elements in the dialog box to configure the filter. Options vary based on filter. A value is required.
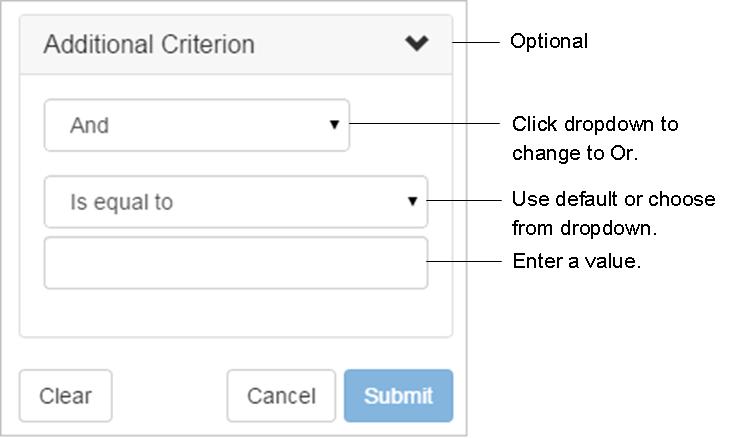
- If you want to apply And/Or logic to the filter, select Additional Criterion. Use the elements in the dialog box to further configure the filter.
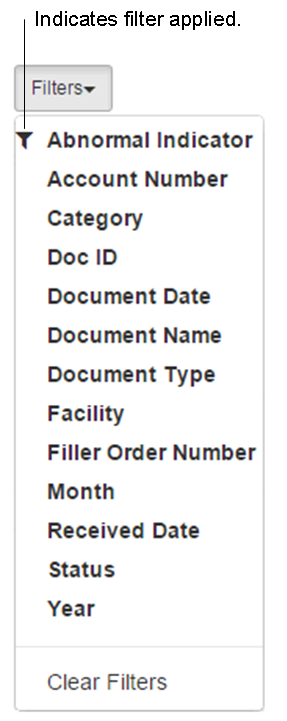
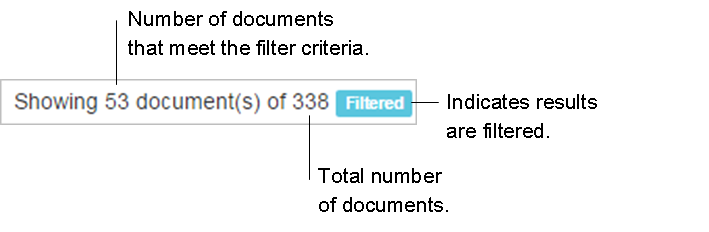
- Select Submit to apply the filter. Documents that meet the search criteria are displayed. When applied as a filter, a filter icon is displayed to the right of a column heading, and to the left of a column name in the Filters list. In addition, the following information is displayed above the grid when filters are applied: the number of documents that meet the criteria, the total number of documents, and a blue box labeled: Filtered.

- If you want to apply more filters, repeat Steps 1-5.
Clear Filters
Complete the following steps to remove filters:
- If you want to remove all filters at one time, select Filters. From the bottom of the Filters list, select Clear Filters.
- If you want to remove individual filters using the column heading method, select the Filter icon to the right of the column heading. The filter dialog box opens. Select Clear.
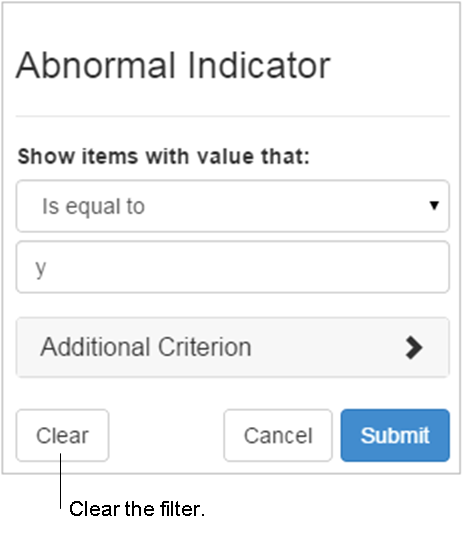
- If you want to remove individual filters using the Filter button method, select Filters. From the Filters list, select the filter you want to remove. The filter dialog box opens. Select Clear.
Columns
The default columns displayed in the document grid are configured at the system level and may also be configured according to group-role. The columns are the same across all three views (Category, Date, Visit).
Note: You can change the default columns, but once changed, you cannot automatically reset the columns to the default configured for your system-group-role.
- Add or Remove Columns
- Manually Reset Columns
- Change Column Width
Add or Remove Columns
Complete the following steps to change the default columns in the document grid:
- If you want to be able to manually reset the columns to the system-group-role default, make a note of the active columns before you make any changes. Remember, you cannot automatically reset the columns to the default. You must do it manually.
- Select Columns.

- From the Columns list, select a column check box. The system updates the columns in the grid.
- If you want to add or remove another column, repeat Steps 3-4.
Manually Reset Columns
Complete the following steps to manually reset the document grid columns to the system-group-role default:
- Find your notes on the columns in place before you made changes (See Add or Remove Columns Step 1).
- Select Columns.
- Use your notes as a guide and select column check boxes (to either select or deselect columns) until the columns in the grid match your notes. The system updates the columns in the grid each time you select a check box.
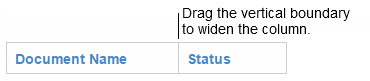
Change Column Width
Complete the following steps to change column width in the document grid:
- Position the pointer over the vertical boundary to the right of the column heading.
- Select and drag the vertical boundary to change the column width.
Sort
If you want to sort the document grid, select any column heading. An up arrow () indicates an ascending sort order, for example, a to z; 1 to 10; oldest date to most recent date. A down arrow () indicates a descending sort order, for example, z to a; 10 to 1; most recent date to oldest date. The sort is specific to each grouping in the active view.
View and Print One Document
Complete the following steps to view and print one document:
- Select one of the following options and complete the steps to select a document:
- Highlight Option
- Position your pointer over the document row to highlight the row.
- Select the row. The document viewer opens, and the document is displayed.
- Check Box Option
- Select the document's check box.
- Select Actions > View Documents. The document viewer opens, and the document is displayed.
- If you want to print the document, complete the following steps:
- From the document viewer toolbar, select Print.
- Make your browser-specific print selections and print the document.
- If you want to download the document, complete the following steps:
- From the document viewer toolbar, select Download.
- Complete any browser-specific steps to complete the download.
- Select Close to close the document viewer and return to the document grid.
- If you want to deselect the document, select the document check box.
Note: Provider Portal does not support functions provided by your browser context menu such as print, select all, and copy. Your browser context menu is suppressed in the portal's document viewer. When you right-click in the document viewer, an "Unsupported Action" message is displayed. Click here for more information about printing in Provider Portal.
Multiple Copies of the Same Document
At the document level, the multiple documents icon indicates that multiple copies of the same document exist. The most recent version of the document is displayed next to the icon.
Select the right arrow icon to expand the view to see all copies of the document.
Actions: View Documents
When at least one document is selected, the View Documents command is available from the Actions list.
Complete the following steps to view or print documents:
- Expand folders until you see documents listed.
- Select the check box of each document you want to view or print.
- Select Actions > View Documents. The document viewer opens, and the documents are displayed.
- If you want to print the documents, complete the following steps:
- From the document viewer toolbar, select Print.
- Make your browser-specific print selections and print the documents. The documents print with page breaks.
- If you want to download the documents, complete the following steps:
- From the document viewer toolbar, select Download.
- Complete any browser-specific steps to complete the download.
- Select Close to close the document viewer and return to the document grid.
- If you want to deselect specific documents, select the document check boxes.
- If you want to deselect all documents, select Check All, then select Uncheck All.
Note: Provider Portal does not support functions provided by your browser context menu such as print, select all, and copy. Your browser context menu is suppressed in the portal's document viewer. When you right-click in the document viewer, an "Unsupported Action" message is displayed. Click here for more information about printing in Provider Portal.
Actions: View Documents Without Breaks
When at least one document is selected, the View Documents Without Breaks command is available from the Actions list. Use this command to remove page breaks when you view or print documents.
Complete the following steps to remove page breaks when you view or print documents:
- Expand folders until you see documents listed.
- Select the check box of each document you want to view or print.
- Select Actions > View Documents Without Breaks. The document viewer opens, and the documents are displayed.
- If you want to print the documents, complete the following steps:
- From the document viewer toolbar, select Print.
- Make your browser-specific print selections and print the documents. The documents print without page breaks.
- If you want to download the documents, complete the following steps:
- From the document viewer toolbar, select Download.
- Complete any browser-specific steps to complete the download.
- Select Close to close the document viewer and return to the document grid.
- If you want to deselect specific documents, select the document check boxes.
- If you want to deselect all documents, select Check All, then select Uncheck All.
Note: Provider Portal does not support functions provided by your browser context menu such as print, select all, and copy. Your browser context menu is suppressed in the portal's document viewer. When you right-click in the document viewer, an "Unsupported Action" message is displayed. Click here for more information about printing in Provider Portal.
Actions: Send to My EMR
If you are authorized, you can use the Send to My EMR command to select HL7-based results and reports from the global repository - document grid view and send them to your practice's EMR. Configuration and EMR interface connectivity (for the specific result types) are required to receive and process the HL7 document transactions. This feature supports both TCP/IP and SFTP transmission protocols. Connected EMRs cannot process interoperability interfaced documents, for example, C-CDAs and CCDs, and other non-HL7 formatted documents. Only result types that existing EMR interface connections support, are available to route to your practice's EMR. The no symbol ( ) is displayed in the Routable column in the Send to My EMR dialog box if you select a result that cannot be routed. You can select the no symbol to see the reason. See Send to My EMR – Not Routable Reasons for more information.
Complete the following steps to route documents to your practice's EMR:
- From the patient summary Documents tab, if search mode is not Global (gray), select Global to execute a global document repository search. See Search Mode for more information.
- Expand folders until you see documents listed.
- Select the check box of each document you want to send to your EMR. Not all documents are routable.
- Select Actions > Send to My EMR. The Send to My EMR dialog box opens. A no symbol () in the Routable column indicates that the document cannot be routed. You can select the no symbol to see the reason. See Send to My EMR - Not Routable Reasons for more information.
- Select the Routing Physician from the list.
- Select Send. The Documents Submitted confirmation message is displayed.
- Select OK.
Send to My EMR - Not Routable Reasons
| Send to My EMR not routable reasons |
| Reason |
Description |
|
Document before [date] cannot be transmitted.
|
The document date is before the configured Send to My EMR start date. |
| Document cannot be transmitted. |
The system determined the result is not routable due to various reasons, for example, the message is formatted incorrectly. |
|
Document is not ready for transmission. Please try again later.
|
The system is still processing the result, so the document is not ready for transmission through Send to My EMR. |
| Document type [name] cannot be transmitted. |
The document type selected is not a result in HL7 format.
|
| EMR is not configured to receive this type of document. |
The EMR is not configured to receive the result type either in system configuration or in the document map. |
Actions: Delete Documents
The Delete Documents command is available only to users provisioned for the _Portal Administration Delete Reports group-role. For this group-role, Patient Search is the portal landing page and patient archive search is enabled (global search is not available). To delete documents, you begin by performing a patient archive search to select a patient and view the patient's documents in the document grid.
Documents that you can delete fall under one of the following ownership types:
- Master Document (the original document)
- Cc'd Document (copy of the Master Document that was sent to other locations)
Exercise caution when you delete documents. You cannot undelete a document. In the document grid, you cannot distinguish between Master and Cc'd documents. For more information, see the Master and Cc'd Documents Explained topic.
Delete Documents Help
- Delete Documents
- Master and Cc'd Documents Explained
- Deleting Consolidated Clinical Document Architecture Documents
- Audit Delete Documents Activity
- Document Undelete
Delete Documents
Complete the following steps to select and delete patient documents:
- If the Patient Search page is not displayed, from the menu bar, select Search.
- Enter information in the Search Filters.
- Select Search. The system performs a Patient Archive search. Find the intended patient in the search results.
- From the intended patient row, select Actions > Documents. The patient's document grid is displayed (Patient Summary - Documents tab).
- If the Doc ID column is not displayed, select Columns > Doc ID to add it to the grid. Documents with the same Doc ID are grouped together.
- From the Category tab, Date tab, or Visit tab, locate the document you want to delete and note its Doc ID (Tip: To expand all Categories, Dates, or Visits at once, select Open All).
- Select the check box in each document row where the Doc ID matches that of the document you want to delete. This ensures that all occurrences of the document (Master and Cc'd) are deleted.
- Select Actions > Delete. The system displays the Delete Documents confirmation dialog box.
- Select Yes to proceed with the Delete action. The documents are removed from the patient's document grid, from the Results Inbox, and from secure messages.
- Check the patient's document grid to ensure that all instances of the Doc ID are gone. If instances remain, repeat Steps 7-10.
- Run the A - Document History Details (Admin Only) report and notify any user who viewed, printed, downloaded, or received the document, that it is now deleted.
- If you deleted a Consolidated Clinical Document Architecture (C-CDA) document, click here for more information.
Master and Cc'd Documents Explained
Documents that you can delete fall under one of the following ownership types:
| Document Ownership Type |
Description |
| Master Document |
The Master is the original document. When the Master is sent to another group, it becomes available in that group's patient Documents (as a Cc'd document). When you delete the Master, you remove the document from your group's patient Documents and from the patient Documents of each group that received the Cc'd document. It is a complete delete. |
| Cc'd Document |
The Cc'd document is a copy of the Master that was sent to other groups. When you delete the Cc'd document, you remove that copy only. It is a partial delete. |
Note: Exercise caution when you delete documents. Ensure that you perform a complete delete of the document (Master and all Cc'd instances). Because you cannot distinguish between a Master Document and a Cc'd Document in the document grid, each document you delete could be either the Master or a copy. Use the Doc ID column to identify and select all instances of the document to perform a complete delete. Ensure that the Doc IDs in the selected rows match before you proceed with the Delete action.
Deleting Consolidated Clinical Document Architecture Documents
You delete a Consolidated Clinical Document Architecture (C-CDA) document the same way you delete other document types. When a C-CDA document is deleted, the associated parsed data is also deleted.
Audit Delete Documents Activity
Use the following reports to audit Delete Documents activity:
- A - User Report
- A - Deleted Documents (Admin Only)
- A - Document History Details (Admin Only)
Document Undelete
In the portal, you cannot undelete a document. If you mistakenly delete a document, select one of the following corrective actions:
Note the following details about an undelete:
- The document will be readded to all practices and nonpractices that previously received it.
- The risk associated with an undelete is that if the document was ever deleted from a specific practice or nonpractice (through a Provider Portal Support request), the practice, or nonpractice can once again access the document.